Tuesday, June 25, 2019

banana chocolate protein toast

Ya'll.  I have been obsessing over this toast for almost a month now.
I had great intentions to tell you about it two weeks ago, but here we are, somehow at the end of June (WHAT?!) and I'm just now getting to it.
Please forgive me, because once you try it you'll certainly be upset with me for waiting so long to share.

I've been doing this challenge at my barre studio - what up Pure Barre Cumming! - and part of it has been about nutrition.
I am always on the hunt for new and exciting ways to eat healthy food.
Personally, I love the taste of healthy food.
But I'm also the type of person that needs variety, so I get in food ruts quickly and often.
Thankfully, it's like my studio can read my mind sometimes, so for the month of June I've been participating in a challenge that isn't just about hitting a certain class count, but also about the nutrition piece of wellness!
The coach of my challenge team has been sharing recipes and ideas with us weekly, and I'll tell you - it's been worth it for this one recipe in particular.

Actually, her recipe for this is a bit different...I've just kind of built on what I prefer, but the idea of mixing protein powder in peanut butter is completely new to me and promptly changed my life once I realized how delicious it can be.
(Thanks for that, Terah!)

So let's discuss.

First off - I did this with Ezekial 4:9 bread and Dave's Killer Bread, the 21 whole grains one.  Use whatever you like!  I prefer Dave's Killer Bread, and my Costco carries it.

Second - I feel like people have a strong preference about protein powder.  I don't see any reason why you couldn't do this with whatever brand is your favorite.  I love Vega brand protein powder, and this chocolate one is bringing me life lately.


Lastly - peanut butters.  Listen, I know some are better for you than others, and there's a whole debate on chunky vs. creamy.  For the purposes of this toast, go for creamy.
In our house, I have an all-natural crunchy peanut butter and the good ol' classic, creamy JIF (#becausekids).  The natural one is a bit better for you calorie-wise, but it's also harder to mix into the protein and not as easily spread because it's refrigerated.
So, to make my own life easier, I used creamy JIF for this and I have zero regrets.
Worth every calorie.
And let's be honest, when you're working out 4-5x per week and eating generally clean, are a couple of tablespoons of JIF really going to kill you?
Just do it and let your inner child be free.


Ingredients:

  • 2 slices of Dave's Killer Bread, toasted
  • 2-3 tbsp creamy peanut butter
  • 1/2 scoop chocolate protein powder
  • 1 medium banana, sliced

Directions:

  1. Place your bread of choice in the toaster.
  2. While bread is toasting, add protein powder and peanut butter to a small bowl and carefully mix.  I find it easiest to use the back of a spoon and sort of mash the peanut butter over and over until it starts absorbing the powder.  It takes a minute for it all to come together, but trust me, it will and it will be amazing.
  3. Spread mixture over each slice of toast, and top with sliced banana.
  4. Enjoy!

I keep telling everyone at work that this toast tastes like Reese's.  The chocolate protein/peanut butter mixture is just so smart, and I don't know the exact number, but think of how much protein you're getting with this!
Dave's Killer Bread has protein, peanut butter has protein, and the powder itself has protein.
I've been eating this on the way to work everyday, and it keeps me full until lunchtime.  
THAT is a miracle in itself, my friends.

Also, if you aren't a banana-lover (hi Kayla 👋), I've used sliced strawberries before as well.
I imagine it would also be really good with fresh raspberries!

Thank you for letting me share a recipe for toast with you.
I mean, it's a little more involved than the recipe for scrambled eggs I shared, so I guess I'm upping my game a tiny bit.
😄

Tuesday, May 14, 2019

chicken bacon brussels sheet pan

I am so into sheet pan meals right now.
After work when I have zero motivation to cook, it's just so easy to throw whatever we have onto a sheet pan, season it up, and roast it all together.
No fuss, easy clean up.
The perfect weeknight meal!

Pro tip: do this on aluminum foil and you won't even have to wash the sheet pan afterward.
That's how easy I'm talking, people.

Also, sheet pan meals are so versatile.
You can seriously use whatever protein and veg you have.
I have made many varieties of this meal lately (and I'll definitely post more on those later), but for now, let me tell you about my current favorite combo.

Chicken.
Bacon.
Brussel sprouts.
Balsamic glaze.

How can you go wrong here?!?!

Spoiler alert: you can't.


Ingredients:

  • 1 lb chicken breast, diced into cubes
  • 1 - 1.5 lbs brussel sprouts, quartered
  • 4-6 slices of bacon (I opted for 6, obvi)
  • 2 tbsp olive oil
  • salt, pepper, paprika, garlic powder - to taste
  • balsamic glaze, for drizzling
Directions:
  1. Preheat oven to 400 degrees, and cover a sheet pan with aluminum foil.  Lightly spray the foil with cooking spray.
  2. Cut the ends off the brussels, and then quarter them - cut in half, then cut in half again.  Spread them out on the pan.
  3. Dice chicken, and evenly distribute the cubes on the pan.
  4. Drizzle olive oil over the chicken and brussels, and sprinkle on seasonings.  I use maybe 1 tbsp of each, give or take?  We like a lot of seasoning around these parts, but you do you.
  5. You have two options with the bacon:
    • Dice the bacon and evenly distribute onto the pan to roast with everything else.
    • Cook bacon separately, and sprinkle on at the end.
      • I only had pre-cooked bacon on hand, so I went with the latter option and sprinkled on at the end.  Both ways are equally delicious!
  6. Place the sheet pan in the oven, and roast everything for 22-24 minutes.
  7. If you chose the latter bacon option like I did, sprinkle crumbled bacon onto everything and gently stir.
  8. Serve it up, and drizzle with balsamic glaze at your leisure!
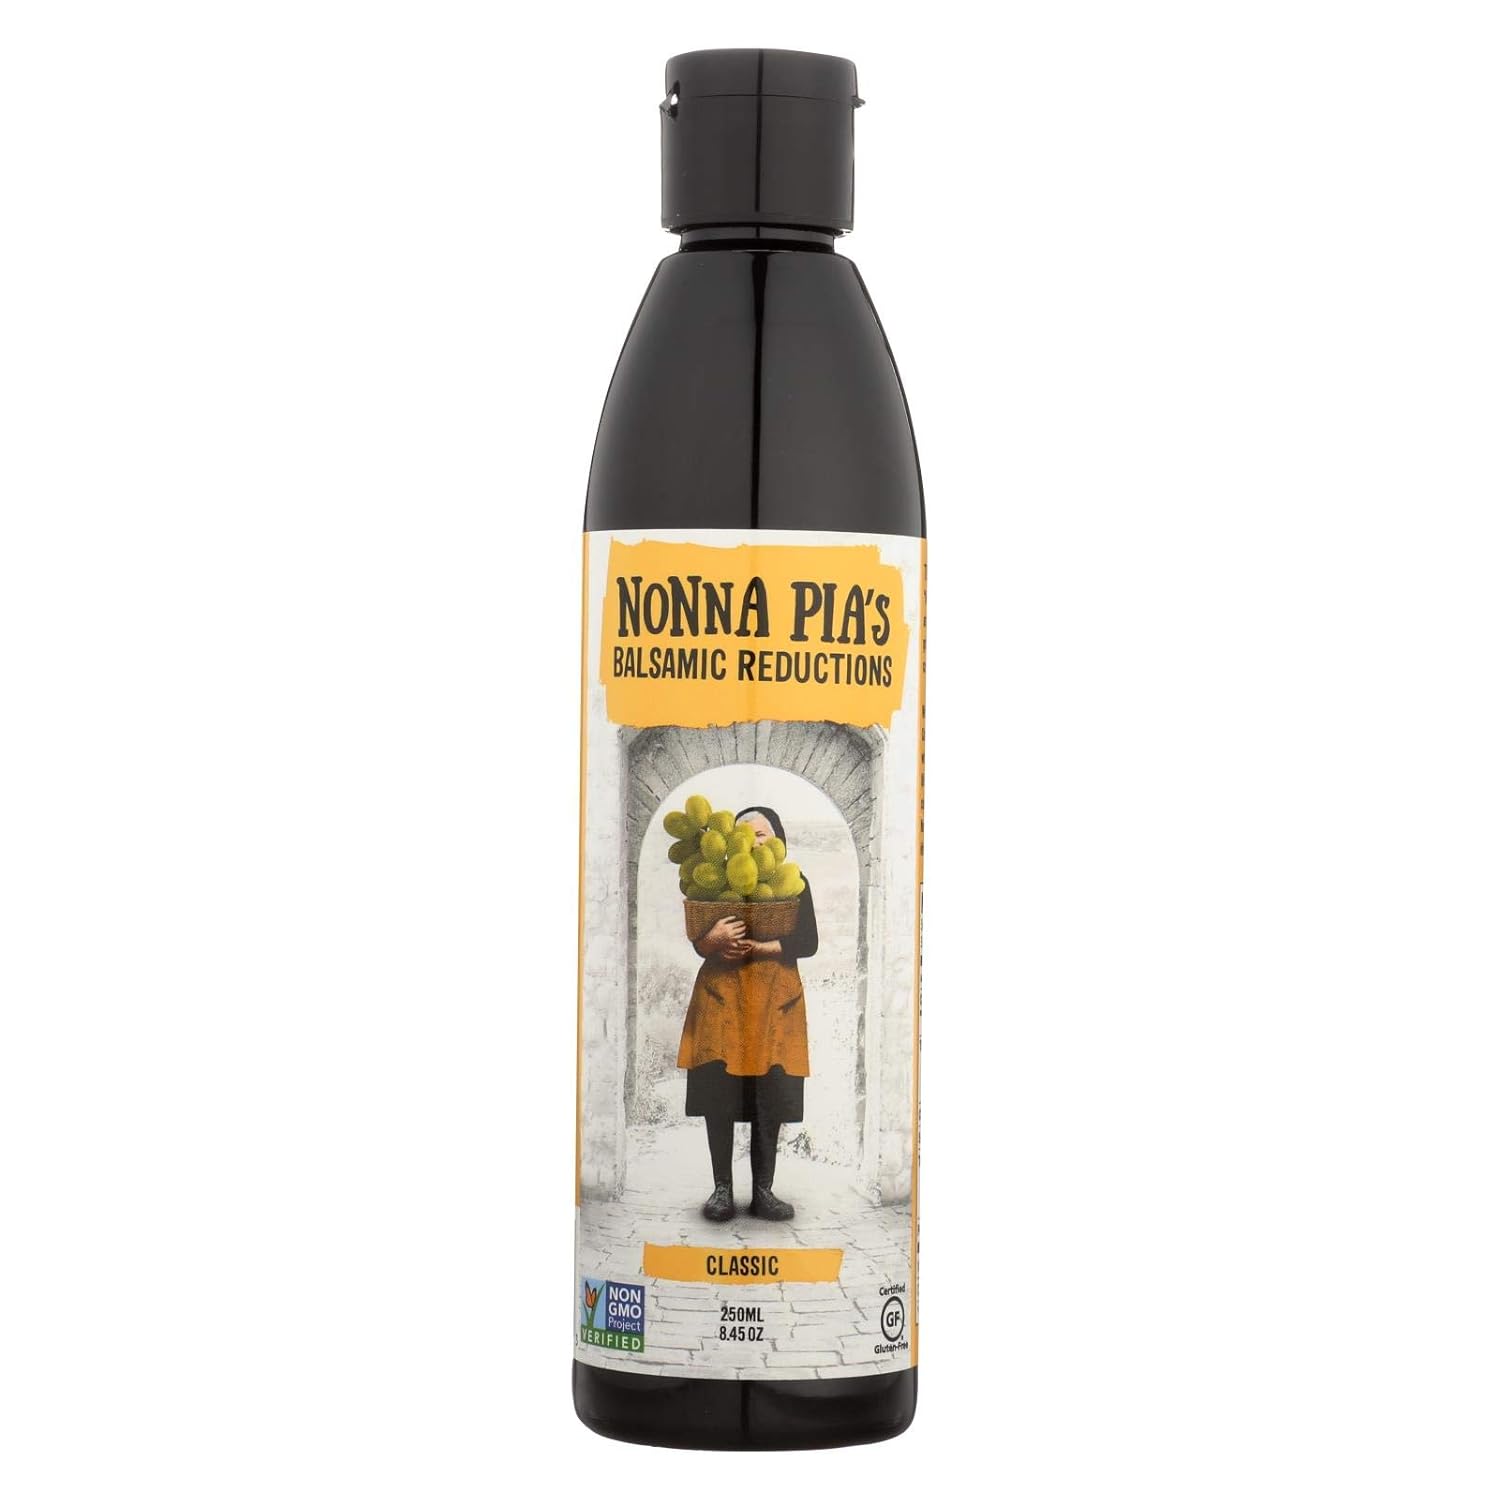
This is my favorite balsamic right now, if you need a recommendation on that.  It is deliciously thick and sweet, perfect addition to a savory meal (or your avo toast!!!).

Image result for nonna pia's balsamic reduction

I have made this many times without the balsamic, and it's super tasty either way.
But personally, I think the pop of sweetness takes it over the top.

I hope you enjoy this as much as I did!

We just got back from vacation with the kiddos, so I am desperately trying to get us back on track food-wise.
I won't lie though - I had the best coconut shrimp of my life on that trip (I see you, Shrimp Basket!) and it was worth every single calorie.
#noregrets

Tuesday, April 2, 2019

turkey taco bowls

Confession: I ate taco meat for dinner Thursday, Saturday, and Sunday last week.
All in different forms (a bowl, a tortilla, and a zucchini boat), but still.
That's a lot of tacos!

I am always looking for new ways to spice it up when it comes to tacos.
I have added vegetables to the mix, tried all the meats (traditional beef, ground turkey, chicken, steak, pork...), put it in casseroles/skillets/various shells, you name it.
Since we've been eating low carb, we've had a lot of the lettuce cup variety...and I mean, a lot.

Like, a lot.

A girl can only eat so many lettuce cups, ya'll.
So lately, I've just been throwing it all in a bowl and calling it a day.
It seems so simple, to just throw it all in a bowl.
I don't know why I didn't do this sooner - mostly because it gives me free reign to add as many toppings as I want without the mess! (Surprise - lettuce tacos aren't thaaat topping-friendly.)

I fully realize that I'm basically telling you to make a taco salad - what an epiphany - but bear with me.
Sometimes we all need a reminder that salads CAN give you the Mexican fix you are craving!


Ingredients:
  • 1 lb ground turkey
  • 1 bell pepper, diced
  • 1 packet taco seasoning (or you can make your own - I like this one!)
  • 1 head of romaine lettuce
  • toppings of choice
Directions:
  1. Brown the ground turkey in a skillet over medium heat.
  2. When the turkey is cooked through, drain, add diced bell pepper and taco seasoning, and saute for 20-30 seconds.  Add some water (about a cup or so) and bring to a simmer for 20 minutes or until most of the liquid is gone.
  3. While the meat is simmering, prepare your toppings. Here's what I like:
    • chopped lettuce
    • shredded cheese
    • this salsa
    • this avocado mash
    • If I wanted to get crazy, maybe a sprinkle of sauteed corn or black beans? Or some crunchy tortilla strips?
  4. When the meat is ready, layer up!  I do equal parts lettuce and meat, then sprinkle the rest on top at my own discretion.  Enjoy!
This is definitely a simple recipe, but for a quick weeknight dinner, you can't beat it.

I mean, unless you're eating real tacos in a flour tortilla.
Or nachos...

Okay, you can't beat it if you are watching your carb intake.  How about that?

This girl has been loving taco meat lately too.


💕💕💕

Tuesday, March 26, 2019

bacon-wrapped stuffed mini peppers

I said it in my last post, but in case you are wondering my status - SURPRISE! Still in a food rut!

We have been keto-ing for awhile (can I use that as a verb?), and while I've been feeling great, I am SO. TIRED. OF. CHICKEN.
At the beginning, I was all ambitious with our meals.  Super motivated, going all out, making all kinds of complex dinners.
Naturally, that tapered out #becauselife. Working, mothering, doing laundry, keeping life together in general - all of these things took over my motivation, and somewhere along the way we started having a protein + roasted veg every night.
And I mean every night.
A girl can only eat so much chicken, ya'll.

Help!
What are your favorite low carb meals? And/or snacks?
I am still on the workout train (love you Pure Barre Cumming 💓), but food-wise I need a major re-haul.

Full disclosure: I made waffles over the weekend, and I don't regret one bite of those.  Not one.
They were the Kodiak Cakes protein waffles (buttermilk flavor), and if you haven't had them, run don't walk to get them now!
They are so versatile! They're great plain but can easily be dressed up, which I love.
I added chocolate chips for Tuck's birthday breakfast, and Saturday morning we had them with strawberries and syrup!
The greatest part is that, depending on how you make them, they can have up to 21g of protein!

Also, can we talk about how great waffle makers are?  I honestly think that's my most-used wedding gift.

*steps off the waffle soap box*

By Sunday, I was ready to get back to the grind.
So, in an effort to pull myself out of this rut, I took a quick survey of all the groceries we had left in the house and decided to spend a little time making a fun snack.

You guys, these were delicious!
IMO, this would be even better with a jalapeno in place of the pepper (I love stuffed jalapenos so much), but we had a bag of mini sweet bell peppers on hand, so I went with it.


Ingredients:

  • 8-10 mini bell peppers
  • 4-5 strips of bacon
  • your favorite pimento cheese (feel free to make your own! I used Palmetto Cheese w/ Jalapenos to spice it up a little)
Directions:
  1. Preheat oven to 400 degrees.
  2. Wash and dry the mini peppers. Slice in half and clean out any seeds.
  3. Put a spoonful of pimento cheese in each pepper. Make sure to smooth it throughout the whole pepper half!
  4. Cut all of the bacon strips in half.  Wrap half a strip of bacon around each pepper.
  5. Put a baking rack on top of a sheet pan, and line the peppers up (seam down) on the rack.
  6. Bake for 20 minutes (or until bacon is at desired level of crispiness) and enjoy!
I sort of wish I brushed these with a smidge of BBQ sauce at the end and tossed them back into the oven to let it caramelize for a few minutes...

However, they were delicious as-is!
And just what I needed to spice up my currently boring dinner routine.
I served these as a side to BBQ chicken cutlets, but they would be great as a pre-dinner appetizer as well!

What fun snacks are you making these days?

Tuesday, March 12, 2019

cheesy chicken and broccoli

This is a lazy recipe.
I'm just gonna go ahead and throw that out there.
But it's lazy in a good way, and it's delicious, and easy, and you should make it because we all have chicken and broccoli and cheese on hand (even when all we want is takeout).


Ingredients:
  • 1 lb of chicken breast, diced into cubes
  • 1-2 tbsp of your oil of choice (I used avocado oil this time, EVOO is perfect too!)
  • 2-3 cloves garlic, minced
  • 1 lb broccoli florets
  • handful of shredded cheddar cheese (maybe a cup? Make it as cheesy as you like!)
Directions:
  1. Cut chicken breast into cubes, and season with salt & pepper to your liking.
  2. Heat oil in a skillet on medium heat, and saute chicken with minced garlic for 2-3 minutes.
  3. Before the chicken is done cooking, add the broccoli.  Continue to saute until the chicken is cooked through and broccoli is tender.  (This would be a great time to add cauliflower rice too, if you wanted some extra veg!)
  4. Drain any extra liquid that has accumulated.  Add cheese and stir for a few moments, until melted and delicious.  Enjoy!
We are still trying to eat mostly low carb meals, but this would be great served over white or brown rice.
I really wanted to add cauliflower rice to ours, but somehow we were out.  Isn't that how it always happens?  I feel like I'm always missing one ingredient if I don't actually meal plan.
We had this for lunch one weekend when I was refusing to grocery shop, but it turned out great and was super quick (which means it would also make a great weeknight meal).

Lord knows I've been looking for easy weeknight meals lately.
Do you have a meal you are loving?
Please share if you do.  I am in the biggest of food ruts.
Especially for breakfast.  I cannot eat one more egg!!!!
#sendhelp

This is an exciting week in the D household.
Tuck is turning 3 tomorrow (HOW?! WHY?! MAKE IT STOP!), and I started my part-time schedule at work to get more time with the kiddos.
Moms in the Atlanta area, what do you do with your kids?

I have all this extra time that I didn't have before, and I want to do all the things!

Tuesday, February 5, 2019

green protein smoothie

I am super into smoothies right now.
Particularly on Saturdays.  I get home from working out at prime chaos time with the kids - everyone is hungry, needs a nap, and I could use approximately ten extra hands to get everything done.
A protein smoothie is the perfect option for something quick, nutritious, and filling enough to get me to dinnertime.

The pictures for this aren't glamorous or anything (I don't have any fancy glasses to pour this in like a proper food blogger would), but you get the gist.
Mostly I just wanted you to see what a pretty green it is!


Like bright green grass in the springtime when it's warm and the freezing cold rain we've been having for months has ended.
No? Just me? I might be a little bitter about the rain...

In my defense, it seems unfair to keep two children indoors for an entire weekend.
We need to run! Play! Ride bikes! Get our sillies out in the great outdoors!
Never have I ever been an outdoor person until I had kids, but Lord please hear my springtime prayer.

I digress.

Here's a smoothie for you to drink while you dream of warmer days.


Ingredients:
  • 3 cups spinach (I just fill my blender to the top with spinach!)
  • 1 cup water
  • 2 tbsp almond butter
  • 1/4 cup plain Greek yogurt
  • 2 scoops vanilla protein
  • 2 tbsp MCT oil, optional
Directions:
  1. Fill your blender with spinach, and add water.  Blend until spinach is liquified.
  2. Add the rest of the ingredients (almond butter, yogurt, protein, and oil), and blend for a few seconds.
  3. Add ice and blend until you've reached desired consistency.  I like to use about 2 cups of ice, as I prefer my smoothies to be a bit thicker.  Totally your preference!
  4. Pour into glasses and enjoy!
Recipe makes enough for two smoothies, so share with a friend!  Or, cut the recipe in half for one serving.

Also worth noting: I originally started making this recipe by adding a banana as well.  SO GOOD.
If you are not on the keto diet, add that banana and rejoice in the delicious drink you have made.
However, bananas are not really keto-friendly, so skip the banana if you're strictly keto.

Not going to lie though, sometimes I still add half a banana if I want to have a real treat. 😍

Happy Tuesday, ya'll!

Tuesday, January 29, 2019

the most perfect cheesy eggs

Can we talk real quick about this "snow day" that's happening in Georgia right now?
My office closed (which hardly ever happens), and it's currently sunny with no clouds.
What on earth?!

I won't lie, I am enjoying the surprise day at home with the kiddos!
But working from home with two small children is a whole thing, ya'll.  I think I could go a lifetime without seeing another Mickey Mouse Christmas movie.
An actual lifetime.

In the spirit of being "snowed" in, staying in pjs all day, and hopefully having the time to make some breakfast in your own kitchen for once (I swear, it is such a luxury to me to make breakfast at home on a weekday - it's what I look forward to on work from home days!), let's talk about cheesy eggs!

Eggs are such a tricky thing.
I don't think I've ever really been good at eggs, honestly.  Mine were always too dry, or had that weird film they get if the pan is too hot when you pour them in, or were just generally meh.
Then one day years ago, Joe decided he wanted to be good at eggs and did some research on how.
Quick question - why did I never think to Google it?
So anyway, he taught me the magic of cooking eggs "low and slow," and boy, does that make a difference.
It takes a liiiiittle bit longer, but it's so worth it.  And when I say longer, I mean it takes like 3 minutes instead of 1 minute.

I will say, I remember him telling me once that you shouldn't season the eggs ahead of time.  I think I prefer to season them pre-cook because it ensures the seasoning is evenly distributed, but they are a little prettier if you don't.
Let's not make this more complicated than it needs to be.
Do we even really care when S&P is added if there's cheese involved?

Didn't think so.


Ingredients:
  • 2 tbsp butter
  • 3 eggs
  • shredded cheese of choice (I used a Mexican blend - sharp cheddar would be tasty too)
  • salt and pepper, to taste
Instructions:
  1. Heat a skillet on low/medium-low heat, and melt butter.  I'd say juuust under 2 tbsp for every 3 eggs you're making. (I think the butter is key and takes them to another level! It's going to look like a lot, but trust me on this.)


  2. Whisk the eggs with some salt and pepper, to taste.  Really whisk them up - put some muscle into it!
  3. Pour them into the butter, and slowly stir until they begin to come together.
  4. When they are still wet in the center, add your cheese of choice.  Add a healthy handful, between 1/4 - 1/2 cup.


  5. Stir a few more times, and take them out of the pan early.  When my gut says they need 10 more seconds, I take them out and they tend to be perfect! (They'll still cook a little on your plate from residual heat.)
I think whisking them up quickly makes them fluffier (am I making that up?), and then cooking them in butter, slowly, and taking them out before they can overcook makes such a difference.
They are so delicious!
And here's the good news - the keto diet encourages you to have butter...and cheese...AND EGGS.  So eat these and bask in your healthiness.

Wednesday, January 23, 2019

protein coffee

I am an avid believer in morning workouts.
Mostly because if I don't do it before noon, I convince myself I'm too busy/tired/insert excuse here and I skip it.
So, many weekday mornings, I'm up at 4:55am to make it to a 5:30am barre class.
I know it sounds hard, but trust me - this is the best way to start the day!!!  The world is quiet, everyone is still asleep, and I can spend some time serving myself before I serve others.  I have found this to be key to my sanity as a working mom.

The thing about morning workouts, though, is that I'm usually ravenous afterwards.
I'm one of those people that wakes up ready to eat a full breakfast, regardless of the time.
So after a tough workout, I am ready to eat anything and everything in sight.
Lucky for me, there's no time for that.
Between getting myself ready, getting the kids ready, prepping bottles for daycare, making sure we all have everything we need for a successful day (in an hour's time, by the way), I rarely have time to cook breakfast at home on a weekday.
And by rarely, I mean, never.

Enter the idea of protein coffee.

I am not the first person to have this idea (thank goodness).
There are tons of threads online about this very notion with tips and tricks, most of which say "whatever you do, do not add protein to hot coffee because it will clump."

And listen, I love iced coffee just as much as the next person.
It's really my caffeine vehicle of choice, if available.
But it's SO COLD outside right now!!!!
I cannot drink iced coffee in a cold car on the way to work in 20 degree weather.  My bones need to be warmed!

I asked this question on Instagram the other night, and so many of you had great ideas.
- Use a frother (I ended up doing this!).
- Use collagen peptides instead (I already do this sometimes, but I had a very specific idea in my head of something new here).
- Try different kinds of blenders and proteins.

So many good things.

So I woke up Tuesday on a mission to try, and it worked!  It wasn't quiiiiite sweet enough, so I tried again today and I think I'm getting closer!
But it's at a place where I think I can share it with you as a base idea, and you can fancy it up however you please.


Ingredients
  • 2 splashes of half and half
  • 1/2 scoop of vanilla whey protein (I used Simple Truth brand for this, but I love Vega brand Protein & Greens too!) 
  • 1 splash vanilla extract - optional
  • 1 cup hot brewed coffee
  • sweetener to taste (I used monk fruit sweetener, sugar would work fine too!)
Instructions
  1. Add the half and half, protein, and vanilla to your frother (or in a cup, if you have a hand frother - I used this one instead)
  2. Froth together until foamy and perfect
  3. Fill your mug with coffee, add a little sweetener, and pour the protein froth on top
  4. Mix and enjoy!
Here are some things I've found:
- A full scoop of protein made the froth kind of pasty...at least for me it did.  It was still delicious, but it wasn't as light and foamy as I personally like it to be. Go with 1/2 a scoop and work your way up - I'm sure some protein brands react differently!
- The particular brand of protein I used is not as sweet as you'd think - I would say the vanilla flavor is extremely subtle - so if you like your coffee sweet, definitely add sweetener!
- The only thing I forgot this morning was a sprinkle of cinnamon on top.  I think that would make this even more of a treat, so do that if you want to get fancy.
- The key is frothing the protein with a cold liquid first, because in this case, the internet wasn't wrong - protein will clump in hot coffee if added in powder form.

Have you ever tried this before?  What was your outcome?
Do you have a favorite way to make coffee?
Please tell me!

And for anyone interested, this is the sweetener I used.
Joe and I have been following a keto diet for a few weeks now, so I'm still learning what we are and aren't allowed to have, but this is a sweetener I have been referred to many times!


Found it here on Amazon if you are interested.

Monday, January 21, 2019

I'm baaaaaaack

Well, it only took me 4+ years to muster the energy to get back on track here.  Guess it could be worse.

Or could it?

A lot of life has happened since I blogged last.  I got married, got a job I love, built a house, had not one but TWO babies, and, well, just turned into some version of an adult, I guess!
I mean some days I do look in the mirror and think "oh my god, who left me in charge of two human lives, I'm just a child myself!"
But then I remember I'm 31 now.
HOW did that happen?

Alas, here I am.
I've spent these last 4 years growing up, becoming a wife and mother, navigating so many new responsibilities...but one thing has stayed constant.  My love of cooking.
I've practiced, failed, triumphed, majorly failed (ya'll, do not put raw garlic into cauliflower mash...trust me on this), and triumphed again.  I am so ready to share with you all that I have learned!

I have so much more to talk about these days, too.  My number one goal here will always be recipe sharing, but I want to chat with you about life things too!  Kids, marriage, motherhood, what it's like to be continuously trying to lose baby weight (oh hi, last 2 years of my life).

Let's be friends again, okay?

Friday, September 5, 2014

one-pot drummies

I don't know about you guys, but I am so pumped it's September.

I mean, I can't believe it's already September, but I'm happy about it!
Bring on the fall weather {even though in Georgia that means it won't be cool until October at the earliest}.
Just the possibility of 'cool weather' sounds like heaven these days.

And because I'm so ready for fall, I've been doing a lot of fall activities these days, like...


...making football wreaths at a champagne-fueled craft night with girlfriends {#godawgs!}...


...celebrating the return of Georgia football with fancy cocktails {thanks, July!}...


...and, of course, having a pumpkin spice latte or two!

It's been great so far, and needless to say, I can't wait to continue the trend right on into sweater/boot weather.

I've also been getting back into my cooking groove.
Particularly with drumsticks {or drummies, as my cute fiance likes to call them}.
We may have had them for dinner twice this week.
Two different ways though - don't judge me!

This is the way I made them last night, and Joe really loved them.
And so did I, because who doesn't like having the whole meal done in one pan?!
To say it was luxurious having hardly any dishes to do afterwards is an understatement.

Unfortunately, I did a horrible job of taking pictures because I wasn't planning to blog about it, but when I pulled the pan out of the oven, Joe ran to get my phone and told me to take a photo.
I guess he knew it was going to be good!

recipe via

Things you'll need:

8-10 chicken drumsticks
6-8 medium-sized red potatoes, chopped into large pieces
4-6 carrots, peeled and chopped into large pieces
sea salt, to taste
black pepper, to taste
1/2 tsp paprika
3 tsp olive oil

Directions:

1.  Preheat oven to 400 degrees.  Line baking dish with parchment paper {or aluminum foil - spray lightly with cooking spray if using foil}.
2.  Chop potatoes and carrots and add to baking dish.
3.  Arrange drumsticks on top of carrot/potato mix, and season with salt, pepper, and paprika.  Drizzle olive oil over the top of everything, and rub seasoning into chicken.
4.  Bake for 1 hour 15 minutes.  If they're not as brown as you'd like, feel free to broil for a minute or two at the end.  Mine browned up just fine though.
5.  Enjoy!

This was a super easy meal to throw together.
The potatoes were soft and flavorful from cooking in the chicken juices, and the carrots were tender and sweet {how do carrots get so sweet and delicious when roasted?!}.
I'd definitely recommend it for a week night when you don't feel like hovering over the stove.

Also, after Joe's first serving, he made it a point to tell me it was a keeper.
That does not happen unless it's serious, trust me.

What are you up to this weekend?

Kayla is coming to visit me tonight, my mom is coming to town, and Sunday is my first bridal shower!!!
Brunch-themed, because duh.

Mimosas on deck!

Thursday, August 7, 2014

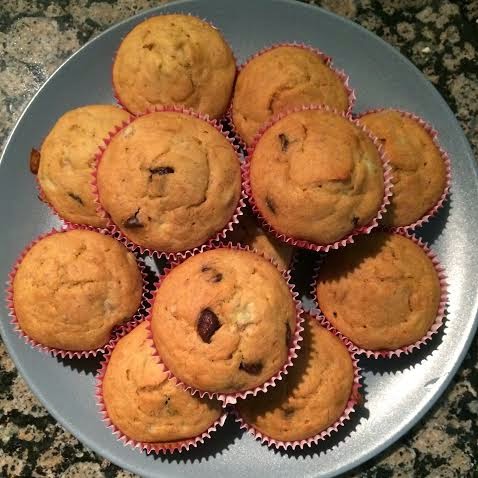
honey banana chocolate chip muffins

I really love working from home.

It's probably good I only get to do it once a week because otherwise I'd never change out of my pajamas.
Or brush my hair, if I'm really being honest.
#sorryimnotsorry

I've always been the type that needs background noise to be able to focus {I never studied in college without at least some music playing}, so there's just something about working while watching endless reruns of Grey's Anatomy that is just right up my alley.

Another part I love about it is the food.
Particularly the lunch possibilities.
When I don't have to waste half my lunch break driving home to pick something up, the sky is really the limit!

Yesterday, I was totally feeling some banana muffins.
Seriously, does it get better than making banana muffins on a random Wednesday afternoon on your lunch break?  Working from home is my jam.
With muffins in mind, I did a little research and decided I wanted to make some sweetened with honey.

I'm all about the honey these days.
Not going to lie, I've even started sweetening my smoothies with it.
Stevia still works fine, I've just found that I just prefer the taste of a drop a honey more.
{And speaking of smoothies, I have found the perfect smoothie blend and will be sharing that with you soon, promise - it's so good that I've had two every day this week!}

Anyway, back to the muffins.
If you're in the mood to make a batch of something delicious that will last, these are for you.
This recipe made 15 muffins, so I put half of them in the freezer {they'll keep for up to three months} and the other half I've been nibbling on and sharing with friends.
Everyone loves a good muffin!

recipe via
Things you'll need:

1 1/2 cups all purpose flour
1 tsp baking powder
1/2 tsp baking soda
1/2 tsp salt
1/4 cup honey
1 large egg
2/3 cup almond milk
3 tsbp vegetable oil
2 ripe bananas, mashed
1 cup semi-sweet chocolate chips

Preheat oven to 400 degrees.
In a medium-sized bowl, combine dry ingredients {flour, baking powder, baking soda, and salt}.
Whisk together to combine.

Mash your bananas.

In a separate bowl, whisk together the wet ingredients {mashed banana, honey, egg, milk, and oil}.

Slowly combine the wet and dry ingredients.
I added the dry mix in three or four batches to ensure it was all combined thoroughly.

Stir in as many chocolate chips as you like!

Lightly grease a muffin pan {or use cupcake liners like I did to make it super easy}, and fill each cup 2/3 of the way full.

Bake for 16-18 minutes, until a toothpick comes out clean.
My suggestion would be to do them a little less than 18 minutes so that they don't dry out {mine are delicious, just a little drier than I would prefer}.
The last couple I baked for 16 minutes and they were a little lighter in color, but definitely more moist!

Cool completely, and enjoy!
Store in an airtight container, or wrap and freeze for up to three months!

These little guys are perfect for a quick breakfast on your way out the door in the morning.
Or, in my case, a quick lunch on a day I had some extra time to bake!
Also, FYI, you do not miss the sugar in this recipe.
The honey does the perfect job of sweetening, and you'd never notice there wasn't white sugar if I didn't tell you.

Whew, it feels good to be in the kitchen again!
Lately I've been cooking a lot, but mostly:
1. repeat recipes that I've already shared;
2. things that are embarrassingly easy and didn't feel post-worthy {like a cucumber tomato salad I've been debating on telling you about for a month}, or;
3. simple sides to go along with grilled BBQ chicken.

I've been making Joe grill me BBQ drumsticks all summer, and I'm almost tempted to force him to guest post about them because oh my god.
He has pretty much mastered the chicken drumstick.
Every time I eat one I'm like hurry up and marry me so I can eat these the rest of my life!

...I wish that was an exaggeration.

Hope you're having a good week!
IT'S ALMOST FRIDAY!

Tuesday, July 22, 2014

catching up

YOU GUYS!
I haven't blogged in two months, and it seriously feels like it was just yesterday.
Is it just me, or is summer flying by?

What have you been up to?
Are you having a fun summer?
I figured I'd catch you up on what I've been doing these past two months since I took an unplanned hiatus so suddenly.

Needless to say, I've been busy.
All over the place.
I don't really feel like I've had any time to breathe, honestly!
But with that said, I will say that most of it has been awesome.


Joe sent me "happy 6 months 'til our wedding" flowers, and my heart melted, appropriately...


...I hosted a girls' night at my apartment, complete with six hours at the pool, cocktails, dinner, and a face mask bar {thanks to Kayla's crafty skills!}...


...I brunched...a lot...


...Joe and I spent the 4th of July in Mexico on a family vacation {I miss you Isla Mujeres}...


...I went to more girls' nights...


...I helped host a nautical-themed baby shower {using this chicken salad for these little crabs!}...


...and finally, I helped host a surprise hashtag-themed bridal shower for a bride friend/fellow hashtag-lover of mine at work {don't get excited, the mimosas were made with sparkling grape juice}.

On top of all of that, there's been parties, dinners, brunches, Orange is the New Black marathons, wedding planning, and a promotion at work!
SO MUCH STUFF.

There's also been a lot of recipe fails.
One day I'll have a cauliflower mash to share with you, but that day is sadly not today.

Question: Have you ever tried to eat paleo before?
Joe is interested in doing it {and when I say that, I mean he's interested in us doing it because I'm the one who makes our meals}, but I don't know too much about it.
Really just touching the tip of the iceberg at the moment.
Any/all suggestions would be great on places to start.

Oh yeah, also, are you watching The Bachelorette?!
#teamjosh

Tuesday, May 20, 2014

cacio e pepe

We've been good with our green smoothies.
Lets eat some pasta, shall we?

Cacio e pepe, meaning "cheese and pepper" in Italian, is just that.
A simple pasta dish with the main ingredients of cheese and pepper.
It really doesn't get any easier.

This is a perfect meal for one of those I-don't-feel-like-cooking-tell-me-what-you-want-to-eat-I-give-up-lets-just-eat-popcorn nights {i.e. last night at our place}.
I was all set to oven-roast some BBQ chicken when I realized the fridge did not defrost my chicken as fast as I had expected.
After a few minutes of frantically pacing the kitchen looking at bag after bag of smoothie fruit, I remembered I had bought the ingredients for cacio e pepe!
Not the healthiest dinner, but I had put it on my grocery list for an occasion exactly like this.
You can't fight fate.

Also, when Joe and I can't agree on what we want for dinner, we have no problem agreeing on pasta.
Especially this one.

recipe adapted via Cup of Jo
Things you'll need:

1/2 box of linguine noodles {or spaghetti noodles; I personally prefer a thicker noodle, but either works fine!}
6 tbsp olive oil
3 tbsp butter
3-4 tbsp ground black pepper {I go heavy on the pepper; again, personal preference}
1/2 cup grated Parmesan, and more for sprinkling

In a large pot, cook noodles according to package instructions.
Don't forget to salt the water!
Unsalted pasta water is total blasphemy.

While pasta is boiling, heat butter and oil on low-medium heat.
Add pepper and stir slowly, letting the pepper gently toast in the butter/oil mixture.
When you add the pepper, it will make the liquid bubble up and become a little noisy {pictured above}.
However, don't fret.
After a little stirring, it will calm down...

...and look more like this.
Brown and toasty and delicious.

When the pasta is done, drain it carefully, reserving about 1 cup of the pasta water.
This step is crucial.
You need that delicious, starchy, salty pasta water to make the magic of the dish come together, trust me on this.
Turn the oil mixture to medium heat, and gently toss in the pasta to coat.
Add the Parmesan cheese and 1/2 cup of the pasta water.
Stir until cheese is melted.
At this point, you can add more pasta water to make it the consistency you like.
I think I ended up adding almost the full cup here {I went for a creamier texture}.

Scoop into a bowl, sprinkle with an extra pinch of pepper, and top it off with some more Parmesan cheese.
Stir and enjoy!

The great thing about this dish, besides its simplicity, is that you can totally make just one serving.
When Joe is traveling, I always have a hard time finding dishes to make for one {that don't include avocado toast or a bowl of cereal}.
I found this recipe on Cup of Jo back in October and have since tweaked it to make closer to 4 servings, but when I'm home alone that's still my go-to recipe {except I always end up adding more pasta water and cheese...I can't help it!}.

Do you have any good one-serving recipes?
Or easy go-to meals for weeknights?

I need some inspiration these days.

How was your weekend?


Joe and I watched some dear friends of ours get married on Saturday {congratulations, Brittany and Brian!} and then spent our Sunday watching Game of Thrones on the couch together.
I'm sorry, is it just me, or does Game of Thrones have a habit of killing off the best characters?
I'm still not fully recovered from Drogo!
I only just started season 3, so I'm trying to mentally prepare myself for all the craziness coming up.

We'll see how that goes.

Oh and also, I officially became that obnoxious bride that has a t-shirt so that everyone will know she's a bride...


...I'll consider myself judged.

Friday, May 16, 2014

a post on dieting + a very green smoothie

Dieting is my jam.

I mean, don't get me wrong, I don't love depriving myself of pizza and tacos and queso forever and ever amen, but if I had to choose between diet and exercise, I'm going diet 100% of the time.

Joe and I had this conversation the other day.
I've been forcing us to try this green smoothie cleanse I read about it, and after a couple of days it was evident that it was a lot harder for Joe than it was for me.
And he seemed to clear it up with one statement.
"I know that if I really want to, I can exercise for an hour and a half every single day, but I just don't think you have that in you."

He was so right.
I don't have that in me.
I've joined every gym and taken every class known to man, and I still only really love walking and yoga.  It's as simple as that.
If I had to choose a strenuous workout, I'd choose spin class - I do love spin.  However, I typically only do spin in one or two-month increments when I'm in crunch mode.
Long-term, walking and yoga have always been my thing.

And dieting.
I'm lucky enough to be one of those people that like and will eat almost anything - except tuna...keep your nasty can of tuna away from me - but I wasn't always this way.
There have been foods over the years that I would never go near that I finally decided I should really put some effort into trying to like.
For example, avocado.
Two years ago I wouldn't have been caught dead eating guacamole.
But after experimenting with different ways to make it and serve it, now I can't get enough!
Slather it on any and all sandwiches you give me, thanks.

My point is, even if you have the plainest of plain taste, it's worth getting out of your comfort zone every now and then and trying new foods.
You never know how much you might really enjoy them!

Last year, I really wanted to start trying more green smoothies.
I even posted about my very first one {which was good, but looking back now I can't believe I didn't liquify the greens first...#newbie}.
Ever since we did the green smoothie cleanse last week, I've started really experimenting and incorporating as many greens into my diet as possible.
And smoothies are the perfect way to do that!  I get more greens in the one batch of smoothie I drink per day than I would eating a salad by far.
Also, I find it incredibly interesting to mix and match the fruits and greens and see what combinations I like best.

This morning I mixed up a particularly good combination, so alas.


Things you'll need:

2 handfuls fresh spinach leaves
1 handful baby spring mix
3 large kale leaves, destemmed
2 cups cold water {more if needed}
2 apples, diced
1 cup frozen peaches
1 cup frozen strawberries
handful of frozen mango chunks
1 stevia packet
2 tbsp ground flax seed

This step I have found to be crucial to keeping me on track.
Before I go to bed at night, I prep as much as possible.
I put all the greens for my smoothie in a gallon-sized Ziplock bag and keep it in the fridge.
I also chop and put any fruit for the smoothie in a bag to be kept in the freezer.
That way, in the morning, all I have to do is grab and blend {and the smoothie gets a great consistency from the frozen fruit, requiring no ice!}.

Add your greens to the blender with the water, and blend until smooth.
The more I make these, the more greens I tend to use, so lately I've had to add an extra splash or two of water to get things moving.

Add all the fruit, and blend until smooth.
If you have a powerful blender {like a Vitamix or something similar}, this will take no time.
My poor, old Black and Decker is on it's very last legs {it's cracked all the way down one side, so it's only a matter of time}, so it takes me a little longer.  More like 3 to 5 minutes.

Once smooth, add stevia and ground flax seed {which I found in the natural/organic section of Kroger} and blend for another 15-20 seconds or so.

This makes a lot of smoothie, so I drink a big cup for breakfast {my to-go cup is 24 oz} and then save the rest to be drank with a light lunch.

Another good thing about this method - because you're using frozen fruit instead of ice to thicken it up, it doesn't melt in the refrigerator!
I have found this to be key.
The other day I had a lunch date so I saved my extra smoothie for dinner, and it was still perfectly creamy and not the least bit watered down 9 hours after I made it.

Can't beat that!

Also, please don't feel like you have to stick with the ingredients I listed.  You can mix, match, and replace anything you want.
I made one with an apple, pear, banana, and peaches the other day that was just as good!
Not everyone likes the bitter taste of kale, so start out more mild if you're intimidated.
All spinach is just as healthy.
Make it your own!

Do you have any go-to smoothie combos?
Dieting tips?

I recently started the '28 to Great' Barre3 challenge online, and so far I'm loving it {although it's seriously kicking my butt}.

It's seven months until the wedding, and that dress is looking more and more elusive...
And speaking of the wedding, I'll leave you with our magnet save-the-date, which finally arrived last week!


Have a good weekend, friends!